How to: PingFed
Initial Remarks
As mentioned on page token exchange we recommend to use a token exchange mechanism before calling another API from your application. This requires a trust relationship between the 2 involved PingFed clients as the API needs to "allow" the calling application to exchange its token for one that has the client ID of the API in the "aud" claim as intended audience.
PingFed has the concept of "Access Token Managers" or ATMs. An ATM defines amongst other things the structure of the access token. Since we aim to consistently use the same access token structure across the CS CoE (i.e. in pRED and gRED), it would be beneficial, if all PingFed clients would share the same ATM.
Furthermore, if several clients share the same ATM this automatically adds a trust relationship between them. This means that no additional trust needs to be established to allow token exchange. However, this is not necessarily what API owners would want. They want to be in control of which applications should be allowed to call them.
If an API is exposed on Gravitee, an approved subscription of the API by an application does exactly that: the API owner approved that the application may call the API. If an API is not exposed on Gravitee, then this approval by the API owner must be included in the PingFed configuration. As a consequence, the PingFed client used by the API needs to have its own dedicated ATM and individual trust relations to other PingFed clients need to be added to an access control list within the PingFed configuration.
| If your application exposes an API, you might already decide whether this API will be exposed on Gravitee or not (see link to ADR). If the API will be exposed on Gravitee, select "pRED/CSCoE ATM" in the client onboarding process below. If the API won’t be exposed on Gravitee, select "ATM with standard token structure" in the client onboarding process below. |
Token Structure
In the past we aimed to all applications sharing the same (minimal) ID and Access token structure. While this is still useful, this requirement can be relaxed with the consistent introduction of the token exchange mechanism. As mentioned above while applications can share the same token structure, the usage of a shared Access Token Manager (ATM) depends on how the application’s API is exposed. In addition the RDT IAM team which is responsible for PingFed created a general token structure which was influenced by and is almost identical to our former pRED token structure.
- ID token
-
{ "alg": "xyz", "kid": "xyz" } { "sub": "doej", "aud": "cscoe-test", "name": "John Doe", "given_name": "John", "family_name": "Doe", "email": "john.doe@roche|gene.com", "groups": "GLOpAppAuth_pRED_Internals_All", # optional "acr": "urn:oasis:names:tc:SAML:2.0:ac:classes:TLSClient", "auth_time": 123, "exp": 123, "iat": 123, "iss": "https://wam.roche.com", "jti": "xyz", } - Access token
-
{
  "alg": "xyz",
  "kid": "xyz",
  "pi.atm": "xzy"
}
{
  "name": "John Doe",
  "sub": "doej",
  "email": "john.doe@roche|gene.com",
  "client_id": "cscoe-calling-app",
  "aud": "cscoe-to-be-called-api",
  "exp": 123,
  "iss": "https://wam.roche.com",
  "scope": "xyz",
}
Client Onboarding
| The below steps describe the requesting flow. Onboarding is always done on PingFederate QA (wamqa.roche.com) first. However, the full client onboarding is only complete after onboarding to PingFederate PRD (wam.roche.com) |
-
General remarks
-
Service Book - This book defines the service for SSO via PingFederate.
-
We have a special chat space with the IAM team in place to follow up on specific technical topics around our PingFed clients. However, for any tasks dedicated SNow tickets must be created.
-
You might order different clientIDs for your different environments ("pred-myApplication-dev", "pred-myApplication-prod"). However, this is not a must. In fact all redirect URLs from all environments can be added to the same PingFed client. See also section environment mapping below.
-
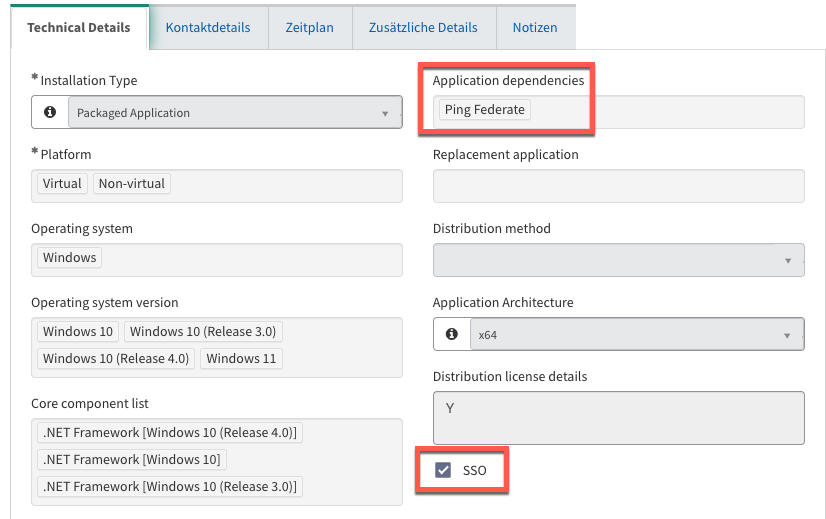
You need to have an entry for your application in ACT (and in order to have that you need to have a SNow service - start here if you need to create new services). Please make sure to mark your application as using SSO and add "PingFederate" as dependency in the tech profile:
-
-
If you need a PingFed client for standard authorization code flow:
-
Follow the instructions in this KB article and use the automated OAUTH integration by creating an iCare ticket using this form.
-
Important: As explained above either select "pRED/CSCoE standard Access Token (API exposed on Gravitee)" or "Standard Access Token Management Policy" (otherwise) in "Access token management OIDC Policy". The iCare form might not yet be updated. In this case select "pRED standard Access Token" when the API will be exposed on Grvaitee and "Standard Access Token Management Policy" if this won’t be the case.
-
The redirect URL(s) are not (yet) included in the form and will need to be configured after the initial setup.
-
Once the client has been tested on wamqa (PingFed QA), you can also use this form for propagating the client to wam (PingFed Prod) by selecting the corresponding value in "Task".
-
-
If you need a PingFed client for other authentication flows (ROPC, Client Credentials, Device Authentication, Token Exchange):
-
use the general RoSE request form for “Web Access Control SSO/Federation/OAuth/OIDC Integration”.
-
Access Token Manager Claims OR existing Access Token Manager Name: As explained above either specify "pRED/CSCoE ATM" (your API will be exposed on Gravitee) or "ATM with standard token structure" (otherwise)
-
OpenID Connect Policy Claims OR existing OpenID Connect Policy: please do not specifiy individual claims but just write "pRED/CSCoE standard token structure"
-
-
After the iCare request has been processed, the following information will be provided to you:
-
Client ID: E.g. "pred-myApplication" or "cscoe-myApplication"
-
Client Secret: E.g. "[secret]"
-
Issuer: E.g.
https://wamqa.roche.com -
Auth endpoint: E.g.
https://wamqa.roche.com/as/authorization.oauth2 -
Token endpoint: E.g.
https://wamqa.roche.com/as/token.oauth2 -
JWKS endpoint: E.g.
https://wamqa.roche.com/pf/JWKS
The URLs mentioned above are also exposed via the api https://wamqa.roche.com/.well-known/openid-configuration
|
| As mentioned above, the initial onboarding is done on PingFed’s QA environment. Therefore the corresponding URLs are mentioned here. However, ultimately the PingFed PROD environment https://wam.roche.com should be used. Depending on the PingFed environment the relevant URLs are https://wam.roche.com / https://wamqa.roche.com / https://wamua.roche.com / https://wamdev.roche.com |
Testing a successful PingFed Client onboarding
Testing the onboarded PingFederate client includes a few simple steps and can help to take a decision to move the client configuration into production.
Create tokens
For creating a token using different flows you can download this Postman Collection. The requests included in the Postman collection are also reflected below:
|
To create a token using the Authorization Code flow (with PKCE): Option 1:
Option 2: alternatively you can also use this Python code. |
- Client Credentials
-
# to create a token using the client credentials flow curl --location 'https://wam.roche.com/as/token.oauth2' \ --header 'Content-Type: application/x-www-form-urlencoded' \ --header 'Authorization: Basic <Base64-encoding of ClientID:ClientSecret>' \ --data-urlencode 'grant_type=client_credentials' \ --data-urlencode 'scope=openid profile' - Device
-
# to create a token using the device grant flow # 1. call curl --location 'https://wam.roche.com/as/token.oauth2' \ --header 'Content-Type: application/x-www-form-urlencoded' \ --data-urlencode 'scope=openid profile' \ --data-urlencode 'client_id=<CLIENT_ID>' \ --data-urlencode 'client_secret=<CLIENT_SECRET>' # 2. call. The 1. call provides the device code curl --location 'https://wam.roche.com/as/token.oauth2' \ --header 'Content-Type: application/x-www-form-urlencoded' \ --data-urlencode 'grant_type=urn:ietf:params:oauth:grant-type:device_code' \ --data-urlencode 'client_id=<CLIENT_ID>' \ --data-urlencode 'client_secret=<CLIENT_SECRET>' \ --data-urlencode 'device_code=<DEVICE CODE>' - ROPC
-
# to create a token using the ROPC flow
curl --location 'https://wam.roche.com/as/token.oauth2' \
--header 'Content-Type: application/x-www-form-urlencoded' \
--header 'Authorization: Basic <Base64-encoding of ClientID:ClientSecret>' \
--data-urlencode 'grant_type=password' \
--data-urlencode 'username=<USERNAME>>' \
--data-urlencode 'password=<PASSWORD>' \
--data-urlencode 'scope=openid profile'
Refresh the tokens
If a refresh token has been configured (and thus requested) you can refresh the ID and access tokens several times during the lifetime of the initially created refresh token. With every refresh you get a new ID, access and refresh token. This new refresh token has the same lifetime as the previous refresh token, i.e. the clock is not reset but continues.
The above mentioned Postman collection contains also a request for token refresh which is also shown below:
# to refresh the tokens
curl --location 'https://wam.roche.com/as/token.oauth2' \
--header 'Content-Type: application/x-www-form-urlencoded' \
--header 'Authorization: Basic <Base64-encoding of ClientID:ClientSecret>' \
--data 'grant_type=refresh_token&refresh_token=<REFRESH_TOKEN>'
Decode the tokens
The token values obtained in the previous steps can be inspected on jwt.io. Check whether they contain all expected claims with the correct values.
You can also decode a token with the following script to check its structure by executing <script name.sh> <token>:
#!/bin/bash

for part in 1 2; do
  b64="$(cut -f$part -d. <<< "$1" | tr '_-' '/+')"
  len=${#b64}
  n=$((len % 4))
  if [[ 2 -eq n ]]; then
    b64="${b64}=="
  elif [[ 3 -eq n ]]; then
    b64="${b64}="
  fi
  d="$(openssl enc -base64 -d -A <<< "$b64")"
  python -mjson.tool <<< "$d"
  # don't decode further if this is an encrypted JWT (JWE)
  if [[ 1 -eq part ]] && grep '"enc":' <<< "$d" >/dev/null ; then
      exit 0
  fi
done
Environment Mapping for OIDC Clients
Onboarding of new PingFed clients starts on PingFed QA (wamqa.roche.com), then continues with PingFed UA (wamua.roche.com) to finally reach PingFed PROD (wam.roche.com). Since PingFed PROD is a GxP environment this process must be followed but theoretically can be done in 1-2 weeks.
| To ensure proper interoperability of all applications using PingFed it is important that all applications are using PingFed PROD on all their environments, i.e. DEV, QA, TEST, PREPROD, PROD. |
PingFed QA and UA should only be used in the initial onboarding or when changes on the PingFed side require testing against a dedicated PingFed environment.
| A PROD client should be configured to accept redirect URLs for all the environments of the application. This way a single PingFed PROD client can be used for all environments of a particular application. |
| The same signing certificate is used for all PingFed environments. Therefore you can validate a token from wamqa with the JWKS URL from wam (as it is done on Gravitee). However, if you use the userinfo endpoint (https://wam.roche.com/idp/userinfo.openid) to validate the token and to retrieve additional user information, then the issuer must be the same. |
Token Exchange
As an introduction please have a look at the Token Exchange page.
When an application needs to call an API of another application it first needs to exchange its token for one with the intended audience (the value in the "aud" claim).
| As a prerequisite the target client needs to be configured for token exchange by the PingFed team. As mentioned in section Initial remarks above this might need a dedicated Access Token Manager (ATM). |
There are basically 2 different token exchange processes which are relevant for this section:
-
token exchange between 2 PingFed applications
-
token exchange from a Janus application to a PingFed application. This is described in more detail here.
The other 2 processes are described in more detail in the Janus documentation:
-
token exchange from a PingFed application to Janus application
-
token exchange between 2 Janus applications
| For creating a request to the PingFed team for both kinds of token exchange processes (PingFed to PingFed and Janus to PingFed) please use the manual config request. |
Here is an example request to turn a source token into a target token. This request is also contained in the above mentioned Postman collection.
# to create a new exchanged token based on a source token
curl --location 'https://wam.roche.com/as/token.oauth2' \
--header 'Content-Type: application/x-www-form-urlencoded' \
--header 'Authorization: BASIC <base 64-encoding of clientID:clientSecret of the source client>' \
--data-urlencode 'grant_type=urn:ietf:params:oauth:grant-type:token-exchange' \
--data-urlencode 'subject_token=<source access token>' \
--data-urlencode 'subject_token_type=urn:ietf:params:oauth:token-type:jwt' \
--data-urlencode 'scope=<as needed>' \
--data-urlencode 'audience=<target client_id>'
Example: Token Exchange for Snowflake
Snowflake has several environments as described here.
Each Snowflake account uses a different PingFed client_id. If unclear which client_id it is you will need to create a Generic Support Request to DataOne Support. Once you know the client_id create a request to the PingFed team for token exchange (see above).
Then use these parameters in your token exchange call (see the request in section Create tokens).
-
audience: the Snowflake client_id
-
scope: session:role-any
Token Exchange initiated by target client
While generally a source client exchanges its token for another token which specifies a target client in its "aud" claim before calling that target application, there can also be the case where a target client initiates the exchange to turn a source token from another client into its own token.
One example for this is when a user logs on to the pRED Cockpit application and a token with client_id "pred-cockpit" is issued. A widget (e.g. from ESAAC) in the Cockpit however uses its own separate client_id when communicating with some APIs. In that case the widget needs to exchange the pred-cockpit token into one with its own client_id "esaac-soda" as shown below. While there could be different ways how to do that, the best option without additional implementation effort is to provide an API endpoint on Gravitee that exchanges the "pred-cockpit" token for an "esaac-soda" token. This API needs to be owned by the "esaac-soda" team as the clientSecret of the "esaac-soda" PingFed client is used for the token exchange. The token exchange can be simply achieved by adding an "HttpCallout" policy and no code is needed in the backend. Similarly, other token exchange API endpoints from other applications would be needed in case their widgets have the same requirements. Exchanging the token directly from the front-end is NOT recommended as otherwise the clientSecret would be exposed.
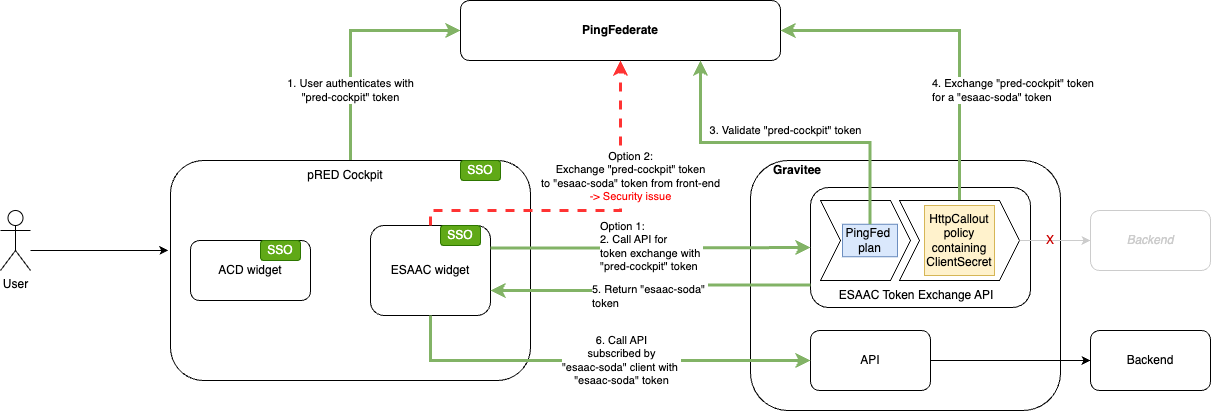
| As a prerequisite the target client needs to be configured for token exchange by the PingFed team. It also requires that both the source and target token share the same "Oauth-pred-jwt" ATM (the pRED standard Access Token Manager). Clients that should be used for token exchange need to be secured by a client_secret. |
| When you create the ticket for the PingFed team (using the manual config request), please add the comment "activate the Token exchange grant at the oauth client and assign the processor policy PRED-TP-Policy to it" (see also Pingfederate pRED Token Exchange). |
The below request turns a source token into a target token. This request is also contained in the above Postman collection.
curl -X POST https://wam.roche.com/as/token.oauth2 \
     -H "Content-Type: application/x-www-form-urlencoded" \
     -H "Authorization: BASIC <base 64-encoding of clientID:clientSecret of the target client>" \
     -d "grant_type=urn:ietf:params:oauth:grant-type:token-exchange" \
     -d "subject_token=<source access token>" \
     -d "resource=https://predtokenexchange" \
     -d "subject_token_type=urn:ietf:params:oauth:token-type:jwt" \
     -d "scope=profile openid" \
Token Validation
Validate the Signature
Validating the signature guarantees the integrity of the token. If the signature validation succeeds the receiving API can be sure that the token has not been changed.
There are two different approaches to validating the signature.
Offline validation using JWKs and the token signature
jwt.io maintains a curated list of libraries for various languages and frameworks which provide convenient functions to interact with oAuth2/OIDC IDPs and also implement the validation of signatures.
Access Tokens issued by PingFederate are signed with a JWK that is accessible from this URL.
https://wam.roche.com/pf/JWKS
| When PingFed was introduced at pRED at the beginning of the OneD program we had to introduce the validation endpoint https://wam.roche.com/ext/OneD/JWT which is different from the default endpoint https://wam.roche.com/pf/JWKS. This was due to some limitations in an earlier PingFed version. While this was and is working fine for integrating pRED applications and APIs amongst each other, it fell short when we needed to integrate with other non-pRED applications which is important in the context of R&D Excellence. Since April 2025 a solution to this problem is available. Tokens can now be validated against https://wam.roche.com/pf/JWKS. With this pRED tokens can also be sent to systems outside pRED. But if systems outside pRED should consume a pRED API, then the API owner needs to change the JWKS URL in Gravitee to https://wam.roche.com/pf/JWKS. Since https://wam.roche.com/ext/OneD/JWT should be decommissioned at some point this change will be eventually needed for each API but can be gradually implemented. |
# Install pyjwt with crypto extension
$ pip install pyjwt[crypto]

# validate.py
import jwt
from jwt import PyJWKClient

token = "<ACCESS TOKEN>"
kid = "fedcert"
jwks_url = "https://wam.roche.com/pf/JWKS"
jwks_client = PyJWKClient(jwks_url)
signing_key = jwks_client.get_signing_key_from_jwt(token)

data = jwt.decode(
    token,
    signing_key.key,
    algorithms=["RS256"],
    options={
        "verify_exp": True,
        "verify_aud": False
        },
)
Online validation using Ping Federate APIs
The offline validation has the huge benefit of performance. No API call is required to the IDP and no risk of overloading the IDP APIs exists However, sometimes it can be a simple alternative to just let PingFederate do the validation. One way to do this is to send the Access Token to the userinfo endpoint which, on successful validation, returns the payload of the ID Token.
For validating a token you can download this Postman Collection which includes requests to the userinfo and introspect endpoints as described below:
- UserInfo
-
# If the token is valid this API will return `HTTP Status 200` and a JSON object with the payload of the `ID Token`. If the token is invalid, the reponse will be `HTTP Status 401`. curl --location 'https://wam.roche.com/idp/userinfo.openid' \ --header 'Authorization: Bearer <ACCESS_TOKEN>' \ - Introspect
-
# If the token is valid this API will return a JSON object with a payload similar to the `ID Token` and explicitely containing the claim "active": true. If the token is invalid, the reponse will be "active": false.
curl --location 'https://wam.roche.com/as/introspect.oauth2' \
--header 'Content-Type: application/x-www-form-urlencoded' \
--header 'Authorization: Basic <Base64-encoding of ClientID:ClientSecret>' \
--data-urlencode 'token=<ACCESS_TOKEN>' \
--data-urlencode 'token_type_hint=access_token'
Validate the Payload
Once the token signature is validated, only a few final checks are required. First the payload needs to be decoded. Again, great instructions as well as libraries to do this are available on jwt.io.
The exp claim must always be validated
|
Which claims need to be validated mostly depends on the API and the Authorization Strategy there. Usually what is needed is either the presence of a user id, stored in the sub claim or the Email stored in the email claim.
In addition also the intended audience in the "aud" claim needs to be checked. The main reason to have a token exchange mechanism in place (see above) is to issue tokens which are only relevant for the intended audience, aka target application.
Coding examples
-
Python sample code for Authorization Code Grant Type
-
AngularJS Typescript Sample Project implementing Authorization Code Grant Type with PKCE and calling the Arvados API
-
Python code for Device Auth Grant
-
Python code written by the CADD team to connect to D360 API
-
Python code written by PMDA Streamlit and PingFed
-
Implementation Example - oAuth2 and OpenID with Spring Framework
API consumption and authentication for data scientists
Data scientists need to call various APIs and are often struggling with authentication when it comes to APIs protected by PingFederate. There is an endpoint (/v2.1/users/accesstoken) of the pREDiLogin API that allows users to generate a PingFed token with the client_id "pred-generic". This simplifies the process for data scientists to access APIs in their scripts and avoids the need to request their own PingFed client or to fetch a token from the browser. It’s important to note that this functionality is not intended for applications which still must use their own dedicated PingFed client.
A Gravitee application connected with the client_id "pred-generic" exists and subscribed several PingFed protected APIs which can be called with a corresponding jwt access token. If you want to check whether an API can be called with a "pred-generic" token, you can simply test it or ask the API owner.
It is important to know that you still need your own Gravitee application in order to subscribe to other APIs protected by an API-key which is also the case for calling the pREDiLogin API. Please be also aware that you are not directly subscribed to the above listed APIs and won’t be informed by the API owners about any (e.g. breaking) changes. You can mitigate this by adding a dummy client_id to your Gravitee application and then subscribe to the API. The API owners are then aware of your subscription although no traffic can be observed related to your dummy client_id.
To API owners: While this approach aims to benefit data scientists, it reduces visibility into individual API consumers. The aforementioned workaround using a dummy client_id can help to keep the overview. If a user asks you to get access to your API with the client_id “pred-generic”, please reach out to christian.blumenroehr@roche.com or moritz.gilsdorf@roche.com. Please be aware that such a subscription assumes that authorization based on the user’s identity in the jwt token is implemented in your API. And of course in case your API is not yet on Gravitee, please publish it.
Links
| Link | Description |
|---|---|
Wiki page from the Roche PingFed team. |
|
Wiki page from the Roche PingFed team. |
|
Wiki page from the Roche PingFed team. |
|
Automated form in iCare for a standard token integration. |
|
Manual form in RoSE for a non-standard token integration. |
|
Includes specific examples for different OAuth 2.0 grant flows. |